FORD SUPER DUTY 7.3L POWERSTROKE DIESEL
Mods, Maintenance, Repair, and Information Home Page
Ford Super Duty Coolant Flushing Procedure
Coolant Flush Write-Up
This is the method I used to flush my coolant and convert from conventional green coolant to ELC red coolant. The coolants that came in 7.3L Powerstroke diesels (green and gold) require the use and monitoring of SCA's. If you fail to monitor and maintain SCA's cavitation can occur, resulting in extreme damage to the block. The new red coolants do not require this type of maintenance.
The excellent article below is used with the permission of its author, Gooch from Alaska, resident coolant expert on several diesel related forums. Gooch is well respected for his coolant knowledge.
Click here for my water pump replacement write-up.
I had a heck of a time finding an ELC concentrate. Next time I will get it here Shell Oil ELC100 ROTELLA COOL CONCENTRATE 6/1GAL ROTELLA ELC (EXTENDED LIFE COOLANT / ANTI-FREEZE)
Gooch's Coolant Flush...
You'll need the following:
- 4 gallons of anti-freeze concentrate.
*Tip* Do not use 50/50 pre-mixed coolant. After flushing, residual water will remain in your engine and cooling system that you can't get out. Therefore, adding pre-mixed 50/50 will further dilute the solution and yield a weak freeze point, along with a low level of corrosion and cavitation inhibitors. Your cooling system holds approximately 8 gallons. Adding 4 gallons of concentrate after flushing, and then topping off with distilled water, will ensure optimal protection.
*Tip* International who made your engine, and who's engine your Ford cooling system was designed around, recommended a Heavy Duty Extended Life Coolant (HD ELC) for all 2/2/99-up built engines (SN 940614-up). These are generally red coolants with operation lives of 300K-750K miles/6-8 years, depending on brand. They are very robust and require no maintenace or additives. Popular brands include International's Fleetrite ELC, Shell Rotella ELC, CAT ELC, Chevron Delo ELC, Peak Final Charge, Prestone Heavy Duty ELC, Zerex Extreme Heavy Duty, etc.
*Tip* Due to International's compatibility tests, all pre-2/2/99 build engines (pre-SN 940614) should use a conventional coolant with the addition of SCA (or a pre-charged conventional coolant already charged with SCA). Most conventional coolants will be green, "low-silicate" and meet ASTM D4985. There are too many brands to list. They will require the addition of a supplemental coolant additive (SCA) at initial fill and maintenance of that SCA thereafter. Most pre-charged conventional coolants will be pink, purple, or blue and meet ASTM D6210. These coolants do not require an initial dose of SCA, but will require SCA maintenance thereafter. These are coolants like Peak Fleet Charge, Prestone Heavy Duty, Zerex Precharge, Shell Diesel Ready, Fleetguard Fleetcool, Fleetrite Fully Formulated, and so
*Tip* Do not use "All Makes - All Models" coolants, or "Universal" coolants. They will not meet the needs of your diesel engine.
- SCA (if using conventional non-charged coolant). Amount depends on the SCA maker (usually 3-4 pints).
*Tip* Either a Nitrite only DCA-2 SCA or a Molybdate/Nitrite DCA-4 SCA will work.
- Up to 20 gallons of distilled water
*Tip*Tap water contains undesirable minerals, chemicals, and pH. If your tap water is good quality, you can do fewer distilled water flushes.
- A Prestone flush kit with 5/8" "T". HERE is a photo of a NAPA #720-1286 5/8" flush kit with "T".
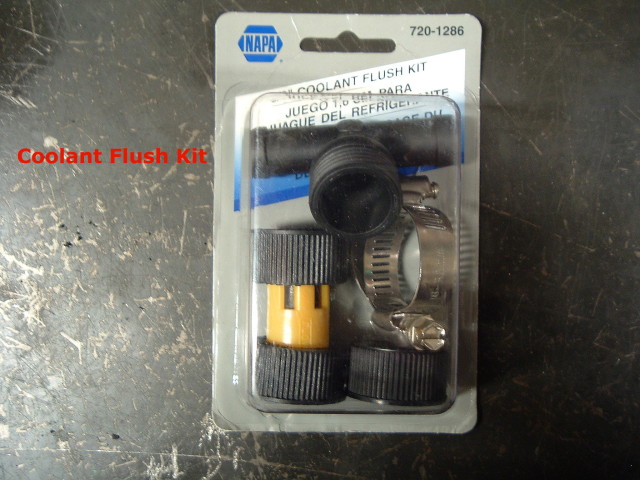
*Tip* The "T" regulates and restricts faucet flow. Directly connecting to your faucet without one of these "T's" could damage your cooling system.
- 1-1/2 foot of 5/8" hose (to go on flush "T").
- A new thermostat gasket. OEM Part# F4TZ-8255-A
*Tip* Now might be a good time to consider replacing:
Thermostat (OEM Part #F6TZ-8575-EA)
Thermostat housing (OEM Part# F81Z-8592-AA)
Upper radiator hose that goes around serpentine belt (OEM Part# F81Z-8260-CA)
Lower Radiator hose (OEM Part# YC32-8286-CE)
Degas bottle cap (OEM Part# F6DZ-8100-A)
New coolant filter (if you've added one)
Any hose clamps that you feel should be replaced.
Tools needed:
- 3/4" wrench for drain plug
- 8mm socket with ratchet and extension for thermostat housing bolts
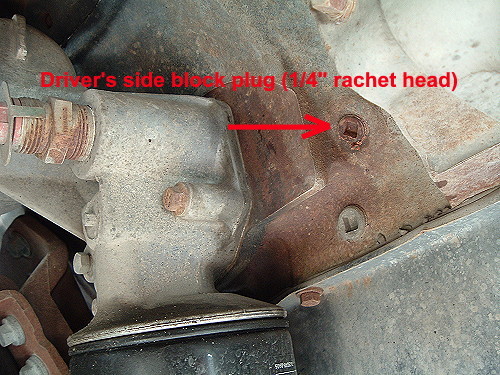
- 1/4" socket driver for block plugs
- Pliers for hose clamps
- Torque wrench to re-torque thermostat housing bolts
- Emery cloth to clean thermostat housing and hose connections
- Bucket and suitable catch containers.
- Funnel
*Tip* A children's small plastic wading pool works good for a catch container. Some fit between the front wheels perfectly.
Flushing procedure:
Park truck on level surface. Allow to cool.
Remove degas bottle cap slowly (be careful if hot).
Use 3/4" wrench to loosen radiator drain valve (bottom left-hand driver's side). Drain into suitable container. Expect at least a 5-gallon bucket-full.
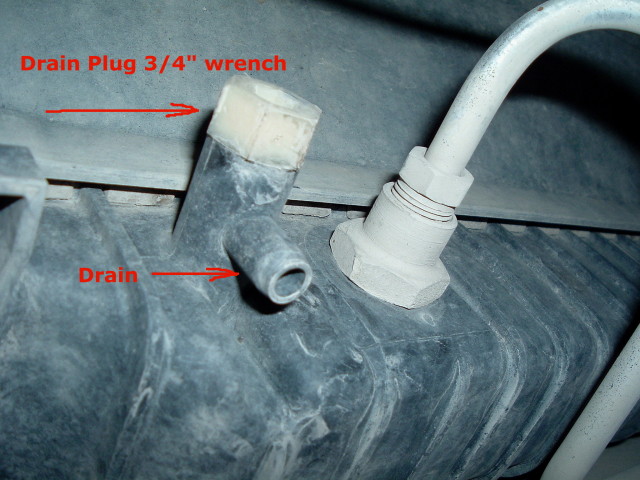
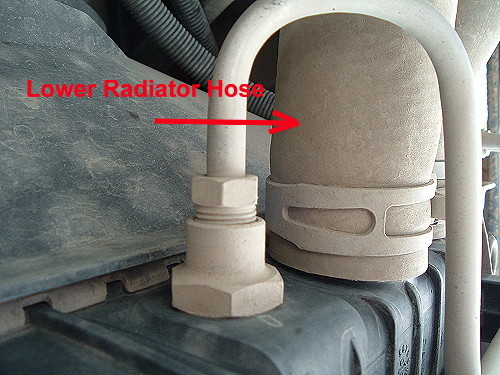
Remove lower radiator hose (at radiator) and drain any sediment and/or coolant from radiator and hose into container.
Remove driver's side block plug with 1/4" socket wrench driver, and drain coolant into suitable container.
Remove passenger's side block plug with 1/4" socket wrench driver, and drain coolant into suitable container.
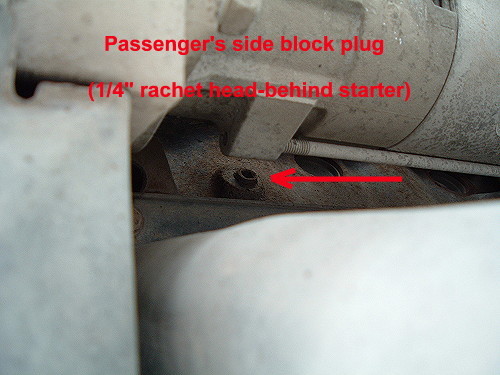
*Tip* This is best done without an extension on the wrench, working under the truck from the top rear side of starter - no need to remove starter.
Re-install both block plugs finger-tight.
Re-install lower radiator hose temporarily.
Close radiator drain valve.
Remove thermostat housing and thermostat.
Re-install thermostat housing without thermostat, using old gasket (it's ok if it leaks a little while flushing and running engine).
Remove heater hose at passenger's side coming off the engine (just below intercooler tube).
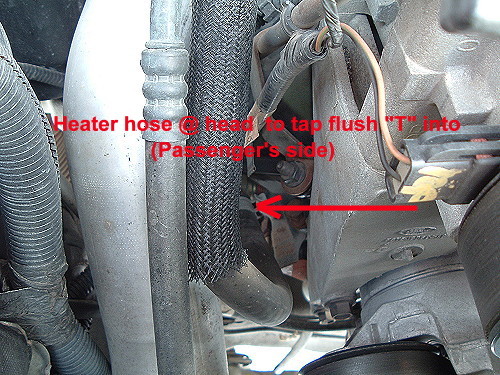
Install that heater hose to one end of the 5/8" flush "T".
Install 1 1/2 foot of 5/8" hose to other end of flush "T", Like this.
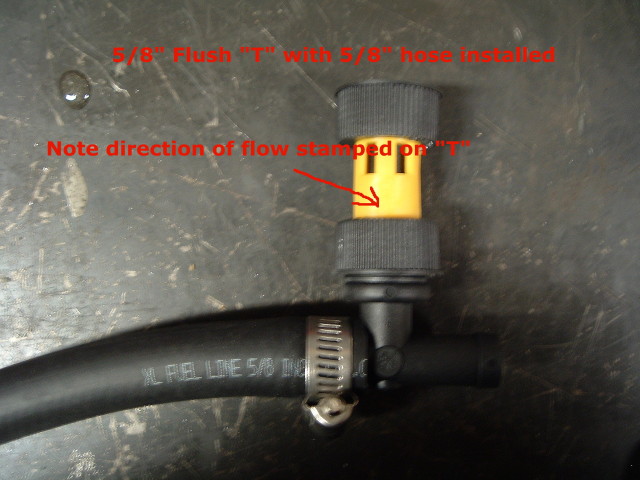
Install the remaining end of the 5/8" hose to fitting where the original hose was removed from the engine.
*Tip* You could permanently install the flushing "T" in the heater hose if desired. The heater hose removed in this procedure is the one consistent with what you'll find on the flush "T" directions. However, you could install the "T" on either heater hose.
Install garden hose onto flush "T", noting the direction of flow stamped on the "T".

Turn garden hose on until clear water (no green tint) runs (backflushes) out of top of degas bottle. This will take several minutes.
With hose still on, start and run engine for a couple of minutes, again until water coming out of degas bottle is clear (no green tint). Minor water leaks and spray from fan are normal.
Turn engine off. Turn garden hose off.
Drain radiator at drain valve, remove both block plugs, remove lower radiator hose.
Remove flushing "T", the extra 5/8" hose, and reinstall the original heater hose back onto engine.
Close radiator drain valve, reinstall and finger-tighten both block plugs, reinstall lower radiator hose (permanently).
Fill system with distilled water until the degas bottle is full.
Run engine a couple of minutes.
Drain radiator at drain valve, remove both block plugs.
Close radiator drain, reinstall and finger-tighten both block plugs.
Again, fill degas bottle with distilled water.
Run engine a couple of minutes.
Drain radiator at drain valve, remove both block plugs.
*Tip* You may decide to flush with distilled water one more time if your tap water is extremely bad.
Close radiator drain valve permanently. Do not over-tighten.
Install both block plugs and tighten permanently and firmly. Sealant can be used on the plugs sparingly, but it is not necessary.
Install thermostat and new thermostat gasket. If reusing the thermostat housing, use emery cloth to clean any rust/corrosion before installing.
Carefully torque the thermostat housing bolts to a maximum 15 ft-lbs. Do not over-tighten.
Add 4 gallons of anti-freeze concentrate to the degas bottle.
If using SCA, add it to cooling system per SCA manufacturer's instructions (usually 3-4 pints).
Add distilled water to finish filling the system until the degas bottle indicates between min/max.
Replace degas bottle cap.
Rinse off any coolant from engine and underbody of vehicle.
Turn in-cab heater valve all the way to "hot". This will help you determine if the thermostat is operating or if there is air left in the system.
Run engine (or drive truck for faster heating), until thermostat opens and hot air is felt through heater in cab. Periodically check coolant level adding distilled water as necessary. If heater does not get hot (or stay hot), it may be necessary to rev engine or purge air from the cooling system.
Add distilled water until level equalizes (min/max mark) in degas bottle (this may take several days).
Use test strip to test and add SCA if applicable.
This method will yield approximately a 50/50 mixture of coolant/distilled water. It is always best to have the freeze/boil protection tested with a quality refractometer. Most shops will do this free.
Write down date and mileage of coolant maintenance for future use.
Click here for my water pump replacement write-up.